Raspberry Pi DAQ server
Connecting the Raspberry Pi to a wireless hub makes it a low cost, small, silent and energy efficient DAQ server.
With the server program written in Python, you can use the numerous Python scientific libraries to analyse your sensor information acquired through the EMANT380 Bluetooth DAQ module. The results can then be viewed by any smartphone, tablet or PC browser that is connected to the wireless hub.
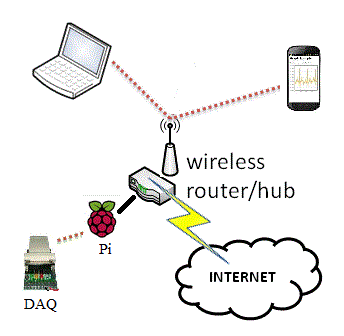
sensor -> Bluetooth DAQ module -> Bluetooth Dongle -> Raspberry Pi -> Network Cable -> Wireless Hub <- Smartphone, Tablet, PC browser
Objective
This is a getting started guide. It is suitable for those who want to create a proof of concept prototype. The information is provided AS-IS and no support is available.
Prerequisites
The reader should be familiar with the following OS and languages
- Linux
- Python
- HTML5
- Javascript
The following software will be used
If the reader is unfamiliar with any of the above, it is recommended that the reader get the basics from the many resources available from the internet when troubleshooting.
The following hardware will be used
- Raspberry Pi Model B with 512K ram and 4G SD card
- Ethernet Cable
- Wireless Hub
- Bluetooth dongle (needed for the Bluetooth DAQ Starter Kit)
- Bluetooth DAQ Starter Kit (optional - otherwise run in simulation mode)
Installation
- Setup up the Raspberry Pi with the Raspbian "wheezy". Please visit Raspberry Start Up for more information
- Connect the Raspberry Pi to the Wireless hub using the Ethernet cable. With the keyboard and monitor connected to the pi, enter
ifconfig
to get the pi ip address - lookout for eth0 inet addr. In my example below the ip address is 192.168.1.21
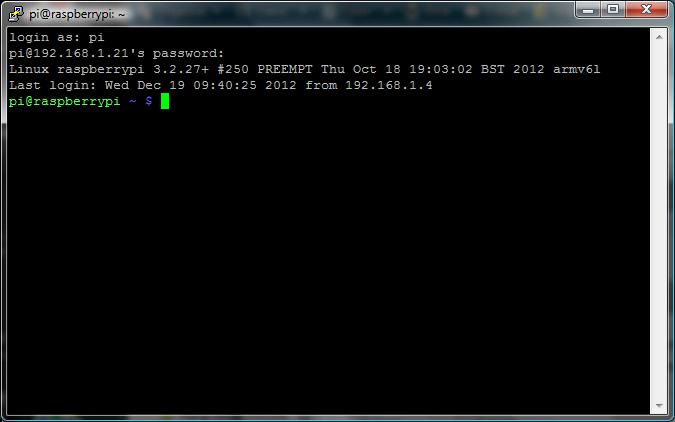
pi@raspberrypi ~/web $ ifconfig eth0 Link encap:Ethernet HWaddr b8:27:eb:f8:f1:6d inet addr:192.168.1.21 Bcast:192.168.1.255 Mask:255.255.255.0 - Using puTTY (or any other SSH software), remotely connect to the raspberry pi using the pi ip address and port 22. The official downloaded Raspbian "wheezy" image starts the sshd per default. I have used the 2012-12-16-wheezy-raspbian version.
- The default username->pi password->raspberry SSH allows you to remotely setup your Raspberry Pi without the need for a keyboard or monitor making it a headless server.
- You will need to do the following if you did a fresh image
sudo raspi-config
- Bluetooth driver and pybluez installation
sudo apt-get install bluetooth sudo apt-get install python-bluez
- To install web.py, goto http://webpy.org/install
- Download pi-daq-web.zip and extract the additional example folders and files for the DAQ server. Using WinSCP or similar software, ftp the files and folders to the web folder created by web.py
- code.py
- code folder
- static folder
- templates folder
- Test web.py in simulation mode. Goto the web folder and enter the following command (use your ip address)
python code.py 192.168.1.21
On your browser, enter your ip address with :8080

- Bluetooth DAQ Starter Kit Installation
hciconfig -ahci0: Type: BR/EDR Bus: USB BD Address: 00:1B:F6:2A:D3:CA ACL MTU: 672:4 SCO MTU: 48:1 UP RUNNING PSCAN RX bytes:1177 acl:0 sco:0 events:38 errors:0 TX bytes:425 acl:0 sco:0 commands:38 errors:0 Features: 0xff 0x3e 0x85 0x38 0x18 0x18 0x00 0x00 Packet type: DM1 DM3 DM5 DH1 DH3 DH5 HV1 HV2 HV3 Link policy: RSWITCH HOLD SNIFF Link mode: SLAVE ACCEPT Name: 'raspberrypi-0' Class: 0x420100 Service Classes: Networking, Telephony Device Class: Computer, Uncategorized HCI Version: 2.0 (0x3) Revision: 0xc5c LMP Version: 2.0 (0x3) Subversion: 0xc5c Manufacturer: Cambridge Silicon Radio (10)hcitool scanScanning ... 00:06:66:00:A1:D8 EMANT380-A1D8
Pair the EMANT380 Bluetooth DAQ module to the Raspberry Pi. Pairing code is 1234
sudo bluez-simple-agent hci0 00:06:66:00:A1:D8RequestPinCode (/org/bluez/2955/hci0/dev_00_06_66_00_A1_D8) Enter PIN Code: 1234 Release New device (/org/bluez/2955/hci0/dev_00_06_66_00_A1_D8) - Test the Bluetooth Starter Kit - Python example program.
- Using WinSCP, goto the web->code folder.
- Edit the WritePort_BT.py file.
- Change the mac address to your EMANT380 Bluetooth DAQ module's mac address
m.Open("00:06:66:00:A1:D8")
- Using PuTTY, goto web->code and run WritePort_BT.py
python WritePort_BT.py
- Using WinSCP, goto the web->code folder and modify myThread.py. Change the mac address to your EMANT380 Bluetooth DAQ module's mac address
m.Open("00:06:66:00:A1:D8")
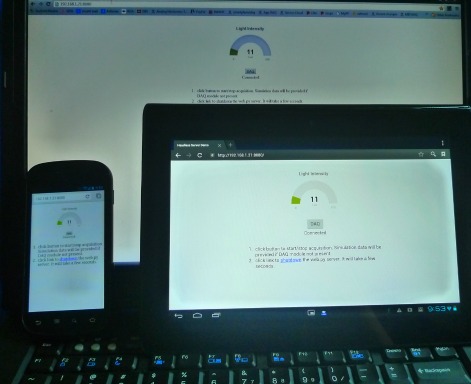
Repeat step 9 to test web.py. This time when you click on the DAQ button, it will be measuring the light intensity.
- Use screen to run the web.py in the background to prevent the web.py program from exiting when you log out the SSH.
Dynamic DNS
In order to access your DAQ server from the Internet, you will need Dynamic DNS if your hub does not have a static ip address. Dynamic DNSis a method of updating, in real time, a Domain Name System (DNS) to point to a changing IP address on the Internet. This is used to provide a persistent domain name for a resource that may change location on the network.
Description on how to set this up for the Raspberry Pi Server can be found in the following links
External Links
Running the Raspberry Pi headless with Debian Linux
JustGage is a handy JavaScript plugin for generating and animating nice & clean gauges. It is based on Raphael library.