The following information is for the EMANT300, EMANT380
Exercise 13 – Create a Windows Application
Objective
Create a Windows Application
Learn about Controls, Components and Properties
Learn about Events
The Windows operating system provides a graphical user interface (GUI). Compared to the console programming, it makes the user's life (but not necessarily the programmer's life) easier. It forms the basis of most modern programs. Manipulating a mouse and clicking on screen elements is definitely more intuitive than a text based menu.
If you incorporate the Standard Graphical controls like text boxes, list boxes etc, your users will be familiar with their use. We will now create a Windows Application that adds two numbers and displays the result.
 Open
the Visual Basic solution VB_2010_Solution.sln.
Open
the Visual Basic solution VB_2010_Solution.sln.Set the WinAdder project as the startup project.
To view the project code, select the project's Form1.vb and press F7
For Windows Application, there is another Windows Forms view. To view the Form, select the project's Form1.vb and press Shift-F7
Press F5 to Start without Debugging
Change the values in the numeric controls. Label1 will change to reflect the sum of the numbers.
Press the Clear button to reset the numeric controls to 0
Close the Window to end the program.
Program 13.1 WinAdder
Public Class Form1
Private Sub Timer1_Tick(ByVal sender As System.Object, ByVal e As System.EventArgs) _
Handles Timer1.Tick
   Label1.Text = NumericUpDown1.Value + NumericUpDown2.Value
End Sub

Private Sub Button1_Click(ByVal sender As System.Object, ByVal e As System.EventArgs) _
Handles Button1.Click
   NumericUpDown1.Value = 0
   NumericUpDown2.Value = 0
End Sub
End Class
ToolBox, Windows Form
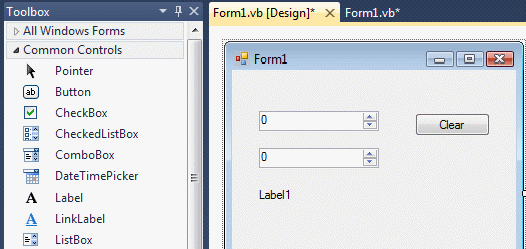
Your screen should be different from the console application programs you created earlier. You have the Toolbox and the Form besides the source code. The Toolbox contains the controls and components that you will place on the Form which is your user interface.
Controls
Label Control
NumericUpDown Control
Button Control
Timer Component
All controls have properties. For example, the button has been made more meaningful to the user by changing the text on the button to Clear. This is done by setting the button control Text property to Clear.
The Timer object is called timer1 and some of its default properties are
timer1.Enabled is false
timer1.Interval is 100 ms
In this program we have set the Enabled property to True so that the timer event is fired every 100ms.
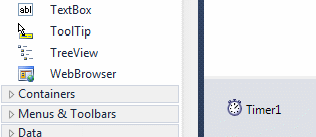
In .NET jargon, a control is a visual component whereas a component is non-visual. Thus, the Label, NumericUpDown and Button are all controls whereas the Timer is a component. A component does not appear (or is invisible) during run-time.
Events
Design of a Windows Application is different from the console application. The Windows program is one main loop that waits for the user or the system to do something. When the user or system does something, an event is triggered. Most of the code in Windows Application comprise responses to events.
An Event in Windows can be activated by the user clicking on a button or when the timer interval lapses.
As the timer elapsed event is fired every 100ms, the answer is calculated and displayed every 100ms.
Label1.Text = NumericUpDown1.Value + NumericUpDown2.ValueWhen the button is pressed, the numeric controls are set to 0
NumericUpDown1.Value = 0
NumericUpDown2.Value = 0
Build this project from scratch